Tuesday, November 14, 2017

Steps 6 - 9: Piston Assembly


The next four steps (6 - 9) all have to do with the assembly of the hydraulic pistons to deploy and recover the scissor bridge.  They are all pretty quick so I'm going to put them all in one post.


Step 6 is the assembly of the bridge cylinder.  It went together pretty straight forward.  The only deviation I made was not using the included medal spring (#40).  The cylinder housing will be painted the same base color as the rest of the vehicle.  The ram (or cylinder shaft) will be painted silver or chrome when the detailing is done.  The only potential problem later on might be the cable clevis (#48).  It looks to be a little delicate.

See the completed bridge piston below:


Step 7, the center launcher cylinder, gave me no issues.  The same painting will be done here as on the bridge piston:  base color and either silver or chrome for the ram.


Step 8, the front launcher cylinder, didn't have any problems either aside from a little flash.  Again, the same painting techniques will be followed.  


Only one last step, #9 the main launcher cylinder.


The only thing different on this one was the addition of the main hydraulic tank (#63).  It's keyed to only fit one way.  

That concludes the assembly of the hydraulic cylinders and pistons that are used to deploy the scissor bridge.  Next I'll start working on the bridge launcher assembly itself.

Stay tuned...


Step 5: Hull Assembly Completion


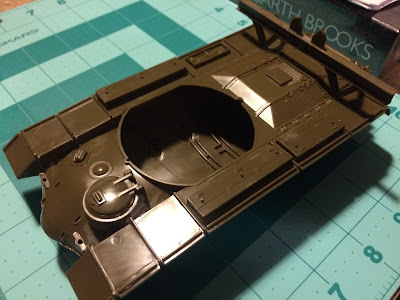
In this step we complete the hull assembly.  Stowage boxes (parts 33 and 34) are attached to the right (31R) and left (32L) fenders.  There's a molded-on toolbox on the right fender with crude tools already in place.  I don't have any 1/40 scale tools or I'd replace them.  The fenders line up very nicely onto the hull.  There are two sets of headlights (39) that I'm leaving off until after painting.

There's a driver figure that I chose to leave off since I'm modelling the kit with the hatches closed.

I've left off the turret completed in Step 4 until after painting and detailing.

All that's left is the bridge rest (#35) and it's left (37L) and right (36R) braces.  There are some sink-holes and ejector pin marks that on the bridge rest that need some sanding and filling; but nothing too bad.


Thursday, November 9, 2017

Step 4: Turret and Gun Mounts


This step was completed pretty fast.  It's basically just setting up the gun mounts in the turret section.  The guns are very crude in my opinion; but I don't have any 1/40 scale guns in my spares bin with which to replace them.  The hatches can be modeled open or closed; but since there's no interior I always model mine closed.  


I dry fit the gun mounts in place in the picture above.  I plan to paint the guns separately and mask off the periscopes before painting the vehicle.  There are seams where the gun halves (parts #25R and 26L) join, some of which are still visible in the picture.  I'll fill it with some Liquid Paper® correction fluid.  This stuff doesn't shrink like putty or wood filler.  It dries really fast and can be primed and painted to blend perfectly.  I remember first hearing about this little trick from Jon Baker of IPMS/Houston many, many years ago.


Monday, November 6, 2017

Step 3: Road Wheels and Return Rollers


Again, more flash on the road wheels; but a few strokes with my emory board took care of it.  The road wheels are made of three pieces:  parts 19x2 and 18.  I cemented them all together but did not put them on the bogeys.  The return rollers are two pieces each:  parts 16 and 17.  I left these off as well.

I finished up this step adding a few other hydraulic cylinders.  The instructions also called for mounting taillights (#21) and the winch (#22).  I'll mount these after detailing them once painting is done.  This looks like it completes the lower hull and running gear.


Step 2: Bogie Assembly


I do like how the instructions include a brief dialog of what all you're supposed to do in each step.  Current kits just give you a picture and a part number and sometimes those aren't right.  


There weren't any real problems with the step.  The bogey assemblies aligned nicely on the ends of the torsion bars.  


Step 1: Hull and Rear Axle Assembly


Given the age of this model, I'm surprised that the instructions are pretty good. 


This step deals with putting together the upper and lower hull pieces and drive axle.  The tow hitches fit easily.  There's are pretty good sized sinkholes on each side of the front of the hull near where the idler wheels will go.  There's also one near the rear of the driver's hatch.  I filled these with Liquid Paper and sanded them smooth.

The detail on the drive sprockets definitely leaves something to be desired.  It's pretty crude if you ask me.  I'm hoping that the Dragon kit is a lot better when it comes out.


There is a problem with the axle fitting through the rear of the hull.  The holes are too big and the axle floats freely.  There's no other part that I can see on the sprue that looks like it will keep the drive axle centered.  I'll have to see what I can come up with later.  For now I'm leaving the axle and drive wheels off until I figure out what I'm going to do.


OK.  I got frustrated with all the masking of the Panda 2S6M Tunguska so it has been shelved for a while.  I'll let you know when I pick it up again.  

This isn't to say that I won't complete something this year!  My model club, the Fort Worth Scale Modelers Society, has kit auctions twice a year:  once in April and again in October.  In October I a kit caught my eye.  It's an older kit; older than I am in fact.  It's the Revell 1/40 scale M48 AVLB (Armored Vehicle Launched Bridge).


This kit came out in 1967.  Supposedly Dragon Models is going to release an updated  1/35 scale version sometime in 2017.  I really like these unique subjects.  Whenever I go to model contests I see tons Panzers and  Shermans along with quote a few M1-series and Bradleys.  This will be something to hopefully catch people's eyes as the check out the other works.

Being an older kit there are some detail issues as well as a fair amount of flash and sinkholes that need to be corrected.  For $10 though, it's hard to argue.  I'll do what I can with it.

I'm taking my time with this and will do a blog post for each step.  Stand by for more!